You’ve probably seen a gooey animation before, right? It’s not that complicated. Most of the effects use a SVG filter to blur and create the goo.
In today’s tutorial, we’ll use that effect on some jumping targets. To add a little more fun, we’ll also create a custom motion path on each click for the targets to follow. Let’s get gooing. See what I did there? Gooing instead of going. Is this microphone on? Enough bad jokes. Here we goo.
Mostly hard coded values
In some other tutorials, I used JavaScript to create the elements and get position and size data. I know some may prefer to set up the vector files and hard code the values. This tutorial does just that. I also use this technique in my Stretchy Nav Tutorial
The Layout
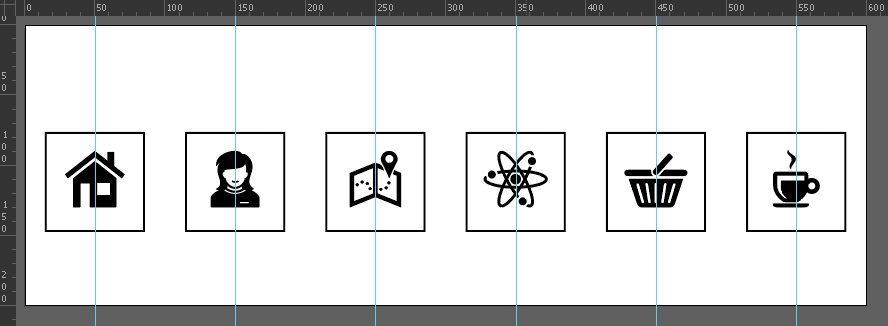
In Adobe Illustrator, I’ve used guides to position the six rectangles and icons. They are centered on 50px increments. I’ve also used a background rectangle so we don’t get any coordinate surprises.
The HTML
I won’t post the full html code as you can check the demo at the end of the article. The setup is fairly straightforward. Each icon and rectangle combo is in a group (those will be our targets) and those groups are in a parent group called icons.
The goo filter
There are many goo tutorials on the web so I won’t get into the explanation of the filters. Suffice to say that we set up the filter with a blur, matrix and blend.
    <filter id="gooFilter">
      <fegaussianblur in="SourceGraphic" stdDeviation="10" result="blur" />
      <fecolormatrix in="blur" mode="matrix" values="1 0 0 0 0  0 1 0 0 0  0 0 1 0 0  0 0 0 20 -8" result="goo" />
      <feblend in="SourceGraphic" in2="goo" operator="atop"/>
    </filter>
The gooey targets
That filter is applied to a group that holds our two jumping targets. In this case, I’m using a couple of rounded rectangles.
<g filter="url(#gooFilter)">
<rect class="jumper goop" x="10" y="72" width="80" height="80" rx="26" ry="26" />
<rect class="jumper goop" x="10" y="72" width="80" height="80" rx="26" ry="26" />
</g>
The JavaScript
First, we need to register the MotionPath plugin and assign some variables. The targets (nested groups) are selected and pushed into an array. The dotCenters array is the center line of each group. From the layout above, we know each group is centered on 50px increments. The yCenter is also from a guide in our layout (it’s not in the screenshot). Max and min travel are the furthest (550 – 50) and shortest distance (150-50) our jumping targets could move. I’ll explain the mapper when we use it later.
gsap.registerPlugin(MotionPathPlugin);

let targets = gsap.utils.toArray("#icons g");
let dotCenters = [50, 150, 250, 350, 450, 550];
let yCenter = 112;
let maxTravel = 500;
let minTravel = 100;
let mapper = gsap.utils.mapRange(minTravel, maxTravel, 0.5, 1);
Other variables
anim is our timeline. active and targets dots are just that – our currently active group and the one we click. maxDur, maxArc and staggers will be explained further along in the tutorial.
let anim;
let activeDot = 0;
let targetDot;
let maxDur = 1;
let maxArc = 150;
let staggers = [0.20, 0.16, 0.135, 0.12, 0.11];
Event listeners
We add a click listener on each icon group and assign it an index. When clicked, it calls the letsGoo() function.
targets.forEach((obj, i) => {
  obj.index = i;
  obj.addEventListener("click", letsGoo);
});
The main function
In the first part of the function, we check if the active target is the same as the one clicked. If that’s true, we return. If false, we move on to check if the timeline exists and is currently playing. We advance the progress(1) if it is playing so we don’t get any weird jumps and tween overwrites.
function letsGoo() {
  targetDot = this.index;
  if (targetDot != activeDot) {
    if (anim && anim.isActive()) {
      anim.progress(1);
    }
A few calculations
To see how far we’re traveling, we subtract the newX from the oldX. With that information, we adjust the duration of the tween and arc of the curve via the mapper. The mapper returns a value of 0.5 → 1 depending on how far we travel. If the input is 100 (the shortest distance), we get 0.5. If it’s 500 (the longest distance), we get 1. All other travel distances return a value between those two.
Why are we doing this? It gives us a factor we can multiply by the maxDur and maxArc. That way, a shorter distance will have a quicker duration and shorter arc. I have a note at the end of this article about the staggers.
    let oldX = dotCenters[activeDot];
    let newX = dotCenters[targetDot];
    let travel = Math.abs(oldX - newX);
    let factor = mapper(travel);
    let newArc = yCenter - maxArc * factor;
    let dur = maxDur * factor;
    let newStagger = staggers[travel / 100 - 1];
Create the motion path
Using the above xPositions and newArc values, we create a quadratic curve for the jumpers to follow (newPath). In this article, I’m not going into details about calculating this on the fly. I do have an upcoming post about Bezier Curves that goes into all the fun details. The d attribute of the path is set to the newPath value.
    let newPath = `M${oldX},${yCenter} Q${
      travel / 2 + Math.min(oldX, newX)
    },${newArc} ${newX},${yCenter}`;

    gsap.set("#main", { attr: { d: newPath } });
The animation
Finally, it’s time to make things move. Ever notice the setup is always more involved than the actual animation tweens? Crazy, right?
Using the motionPath plugin is super simple. We target our two jumper rectangles and tell them to follow the new path we generated above. They follow one another via the stagger property.
The second tween simply rounds the rectangles to a full circle and back during the movement tween. That’s just a stylistic choice. I thought it looked cooler and that’s what it’s all about, right?
    anim = gsap.timeline().to(
      ".jumper",
      {
        motionPath: {
          path: "#main",
          align: "#main",
          alignOrigin: [0.5, 0.5]
        },
        stagger: newStagger,
        duration: dur,
        ease: "sine.inOut"
      }
    )
   .to(".jumper", {duration: dur/2, attr:{rx:40, ry:40}, yoyo:true, repeat:1}, 0);
The end of the function
The end just has the return if the clicked and active targets match. Finally, we set the active to the target and we’re ready for the next click.
  } else {
    return;
  }

  activeDot = targetDot;
}
The final result
Once we put all that together, we get a super smooth, gliding gooey nav.
See the Pen Gooey Nav Tutorial Final by Craig Roblewsky (@PointC) on CodePen.
The staggers
I tried using a value based on the travel distance, but some of them didn’t feel right. Then, I started manually adjusting the values as I only needed five (one for each possible jump distance). I settled on some stagger values that felt right with the gooey effect. Those were hard coded into the stagger array and chosen from that array depending on travel distance.
Sometimes web animation is more art than science. That was especially true here as I wanted the right feel for the goo.
Final thoughts
With proper prep in your vector software, you can easily enter hard coded values for your designs, animations or SVG gooey navigation. Just use those guides and a background rectangle and you’ll be good to go. Until next time, keep your pixels movin’.


