Grab your yoga mat. It’s time to do some stretching. Well, maybe not that kind of stretching. We’re gonna animate the width and x attributes of a rectangle between some targets. We’ll add some fun easing to give it an organic stretchy feel.
I’ve created elements dynamically and measured the positions, widths, etc. and placed those values into arrays in some of my other tutorials. I know that can be intimidating for some so I thought we’d shake it up this time and use hard coded values based on our design in Adobe Illustrator for our SVG stretchy navigation.
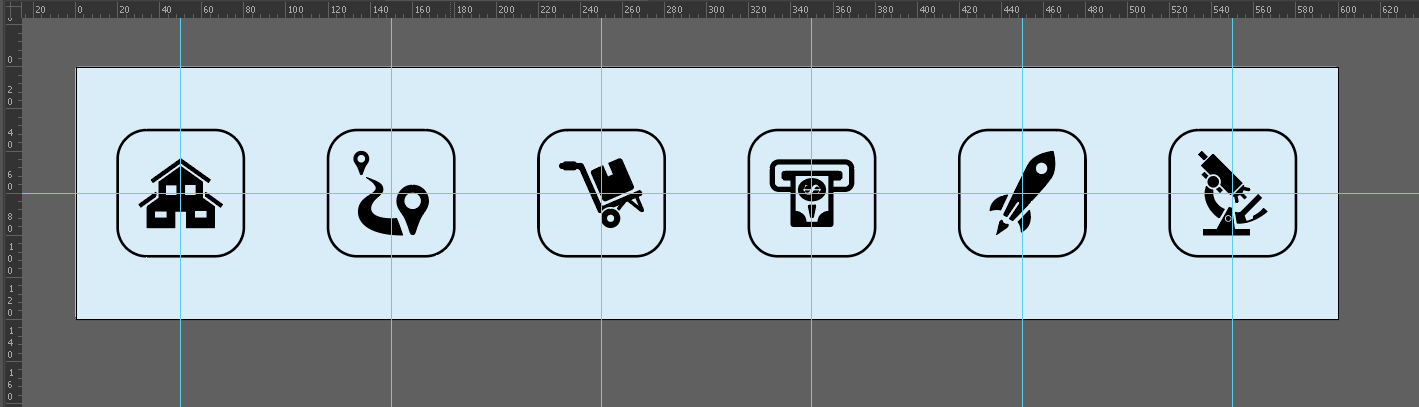
The design
I’m using six targets. Each is a simple icon with a background rectangle. I’ve laid this out carefully in Adobe Illustrator by using guides. You can see the layout in the image below. Each target is 60 pixels wide and the first target is centered on 50px. Each subsequent target is spaced another 100px.
Note the use of a background rectangle so we don’t get any coordinate surprises when we export. If you’d like more info about that technique, I have a whole article here.
The exported code
We have a rectangle named ‘#stretchy’ and six groups. Each of the target groups has an icon and a rectangle. All those groups are added to a parent group called ‘#icons’. The background rectangle used for export sizing has been deleted because we don’t need it now.
<svg id="demo" xmlns="http://www.w3.org/2000/svg" width="600" height="120" viewBox="0 0 600 120">
  <rect id="stretchy" x="20" y="30" width="60" height="60" rx="8px" ry="8px" stroke-miterlimit="10" />
  <g id="icons">
    <!-- groups of icons and a rectangle -->
  </g>
</svg>
The styling
I’ve added a bit of CSS to style the target groups. That’s one of the nice things about exporting from Adobe Illustrator using presentation attributes — you can overwrite any of them with CSS or inline styles.
#icons path {
  fill: white;
}

#stretchy {
  fill: #5da662;
}

#icons g {
  cursor: pointer;
}

#icons rect {
  fill: transparent;
  stroke: rgba(255, 255, 255, 0.15);
  stroke-width: 2px;
  rx: 8px;
  ry: 8px;
}
The Javascript
First, we need some variables. We’ll use a GreenSock utility method to add our target groups to an array. As I mentioned at the beginning, in most cases I’d create the elements dynamically or get their BBox() for the size and position data. Instead, let’s take the info from our vector layout.
From the layout, we know the left edge of the first target is at 20. Each of the other five targets is +=100 further along the x axis. We hand code the targetStarts array with this information.
The other variables are for our animation timeline and starting target index. I’ll explain maxDur when we animate later in the tutorial.
let targets = gsap.utils.toArray("#icons g");
let targetStarts = [20, 120, 220, 320, 420, 520];
let anim;
let activeDot = 0;
let targetDot = 0;
let maxDur = 0.6;
Event listeners
Using a forEach loop, we add a click listener and assign an index to each of the nested target groups. On click, we call the letsStretch() function.
targets.forEach((obj, i) => {
  obj.index = i;
  obj.addEventListener("click", letsStretch);
});
Initial checking
The first part of the function checks the index of the target we just clicked. If it’s the same as our active target, we return and nothing happens.
If we have a new target, we check if anim (our animation timeline) exists and if it’s currently playing. We jump the progress(1) to the end (if it is playing) so we don’t get any weird jumps and tween overwrites.
function letsStretch() {
  targetDot = this.index;
  if (targetDot != activeDot) {
    if (anim && anim.isActive()) {
      anim.progress(1);
    }
Timeline variables
Once we’ve completed the above checks, it’s time to make some calculations. oldX and newX are the leftmost edge of the current target and the one to which we are animating.
The travel variable is how far apart the x positions are from each other. The factor variable uses a mapRange utility from GreenSock. We know the targets are 100 units apart. Therefore, the shortest distance one could travel is 100 units and the furthest one could go is 500. We then map that range to an output of 0.5 → 1. If we travel 100, the output is 0.5. If we travel 500, the output is 500. The other distances will fall between those two.
Why are we doing this? I’m adding this feature so we can adjust the duration based on how far the stretchy rectangle is moving. I mentioned the maxDur variable earlier. We now use that by multiplying it by the factor we just calculated. Shorter travel distances will result in shorter durations. You don’t have to do this. You could just use a single duration value for all tweens, but I find it adds a bit to the animation.
    let oldX = targetStarts[activeDot];
    let newX = targetStarts[targetDot];
    let travel = Math.abs(oldX - newX);
    let factor = gsap.utils.mapRange(100, 500, 0.5, 1, travel);
    let dur = maxDur * factor;
Making the anim timeline
Now the fun part. We have all the variables we need. The only part we still need to know is this: are we stretching left → right or right → left? It makes a difference in how we animate. We figure this by checking if (newX > oldX). If true, we are animating left → right.
Left → right
We would first animate the width. That value is the travel distance + 60 (the width of our targets). At the end of that tween, we animate the width back to 60 and the x attribute to the leftmost edge of the target we just hit. I also delayed the second tween slightly with the position parameter.
    anim = gsap.timeline({ defaults: { duration: dur, ease: "back.in(2)" } });
    if (newX > oldX) {
      anim.to("#stretchy", {
        attr: { width: travel + 60 }
      });

      anim.to(
        "#stretchy",
        { attr: { x: newX, width: 60 }, ease: "back" },
        "+=0.08"
      );
Right → left
If we’re moving right to left, we first need to animate to the left edge of the stretch rectangle to the left edge of the new target. At the same time, we animate the width to the travel distance plus that same 60 width of the old target. Once that tween finishes, we animate to the width of 60. No x tween in this one because it’s already in the correct x position from the first tween.
    } else {
      anim.to("#stretchy", {
        attr: { x: newX, width: travel + 60 }
      });
      anim.to("#stretchy", { attr: { width: 60 }, ease: "back" }, "+=0.08");
    }
A little squash
Regardless of which direction we’re animating, we squash the rectangle a bit over the duration. That’s when one of the above animations is playing its first tweens. Since we set the repeat to 1 and yoyo to true, the squash comes back to full height over the second part of the above tweens.
// adding a little squash to the target
anim.to(
      "#stretchy",
      {
        duration: dur,
        ease: "sine.inOut",
        attr: { height: 30, y: 45 },
        yoyo: true,
        repeat: 1
      },
      0
    );
Closing out the function
The rest of the function has the return I mentioned earlier (if we click the currently active target). Finally, we set the activeDot (target) to the targetDot so we’re ready for the next click.
  } else {
    return;
  }

  activeDot = targetDot;
}
Eases
You’ll notice I set a default of ease: “back.in(2)” on the above timelines. That will only apply to the first tween in the if/else because the second tweens have their own ease set to “back”, which is the equivalent of “back.out”. So, we ease into the big stretch and then, with a little playfulness, we exit the second tween with a bit of an overshoot with “back.out”.
The final result
Once we put it all together, you get a playful stretchy animation.
See the Pen Stretchy Nav Tutorial Final by Craig Roblewsky (@PointC) on CodePen.
Final thoughts
If you pay close attention to your asset prep by using guides and a background rectangle for exports, you can use hard coded values in your animations. If that’s how you prefer to do things, go for it.
I hope you didn’t pull any muscles with all the stretching we did today. Until next time, keep your pixels movin’.


