I love morph animations. They can be so hypnotic and cool. Getting the vector files ready in Adobe Illustrator can be a bit tricky, especially for certain types of morphs. I’ll show you how to tame the vector beast for buttery smooth organic SVG morphing.
A simple melt
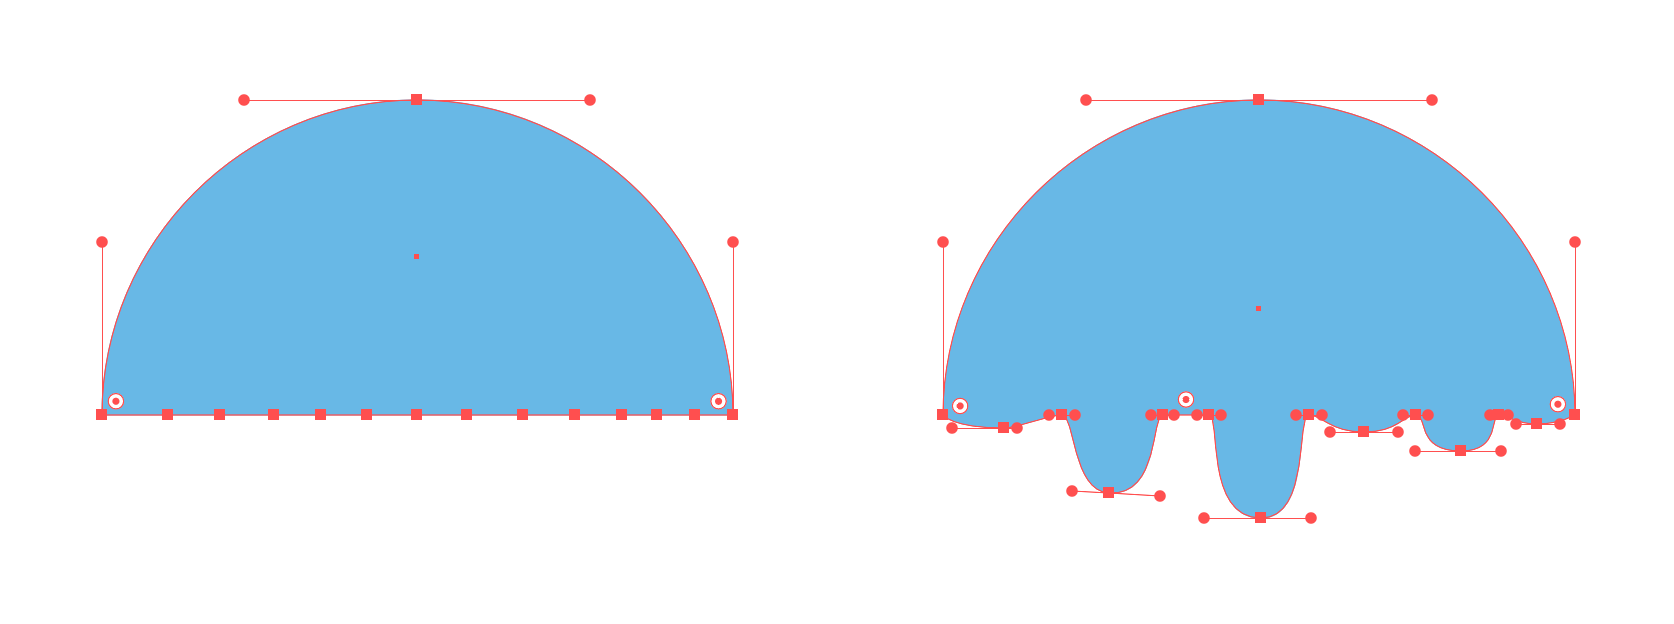
A quick hop into Adobe Illustrator and we’ll create a half circle, which will act as a sort of ice cream without a cone. We want it to drip from the straight edge on the bottom.
To do that, I added 11 points along the bottom edge and randomly pulled a few down until it looked like it was melting (figure 1).
The morph code
Using the MorphSVG plugin from GreenSock is really simple. It’s all done with one line of code.
gsap.to("#start", { duration: 2, morphSVG: "#end" });
Morphin’ time – go go power… oh wait. That’s something different. We did an awesome job getting the paths ready so our two paths should morph beautifully and look like it’s dripping. Here we go.
See the Pen Melt Export by Craig Roblewsky (@PointC) on CodePen.
Houston, we have a problem…
Something is wrong. That didn’t look good at all. What happened? First, I’ll say the MorphSVG plugin is terrific and it has done nothing wrong here.
You don’t even need the same number of points on each target and the plugin does an excellent job of interpolating between the paths. However, if you keep the points the same, you’ll get much more consistent and predictable results. That’s what happened here.
Thanks a lot Illustrator
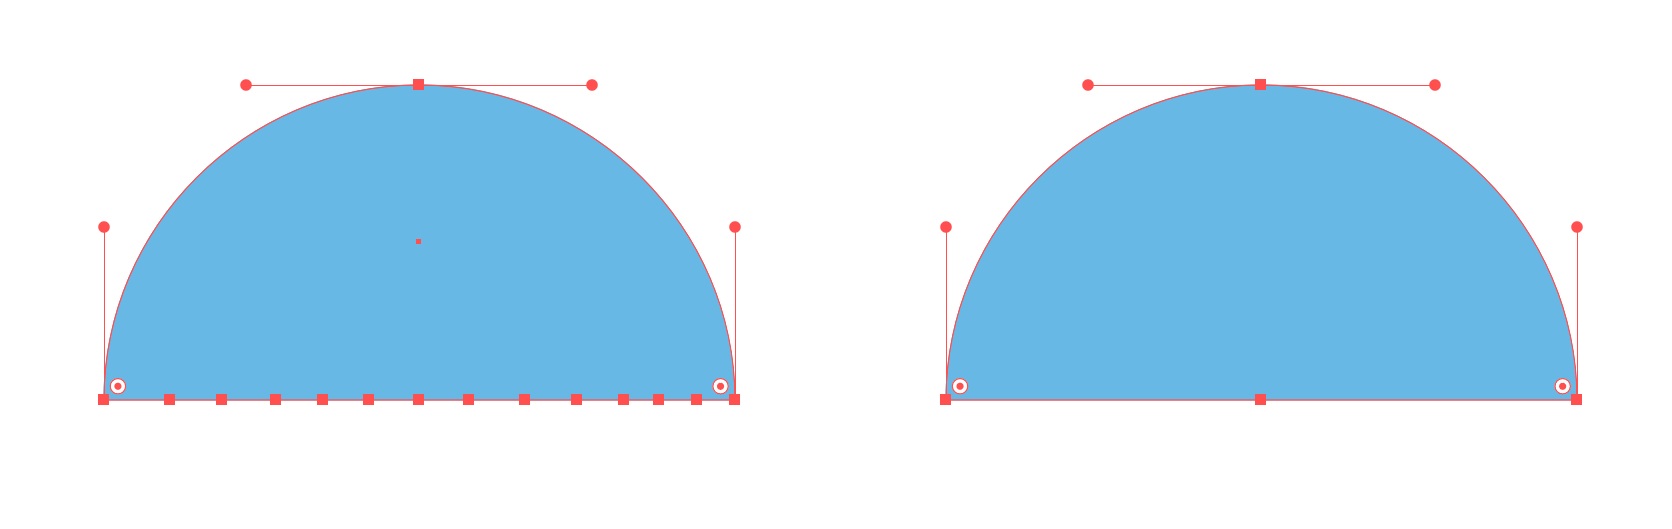
AI is trying to be helpful. It looked at the start path and simplified it. Remember at the beginning when I said I added 11 points to the bottom edge of the start shape? When I exported the file, Adobe Illustrator decided we didn’t need those to make a straight edge so it wiped them out for us (figure 2).
This happens frequently
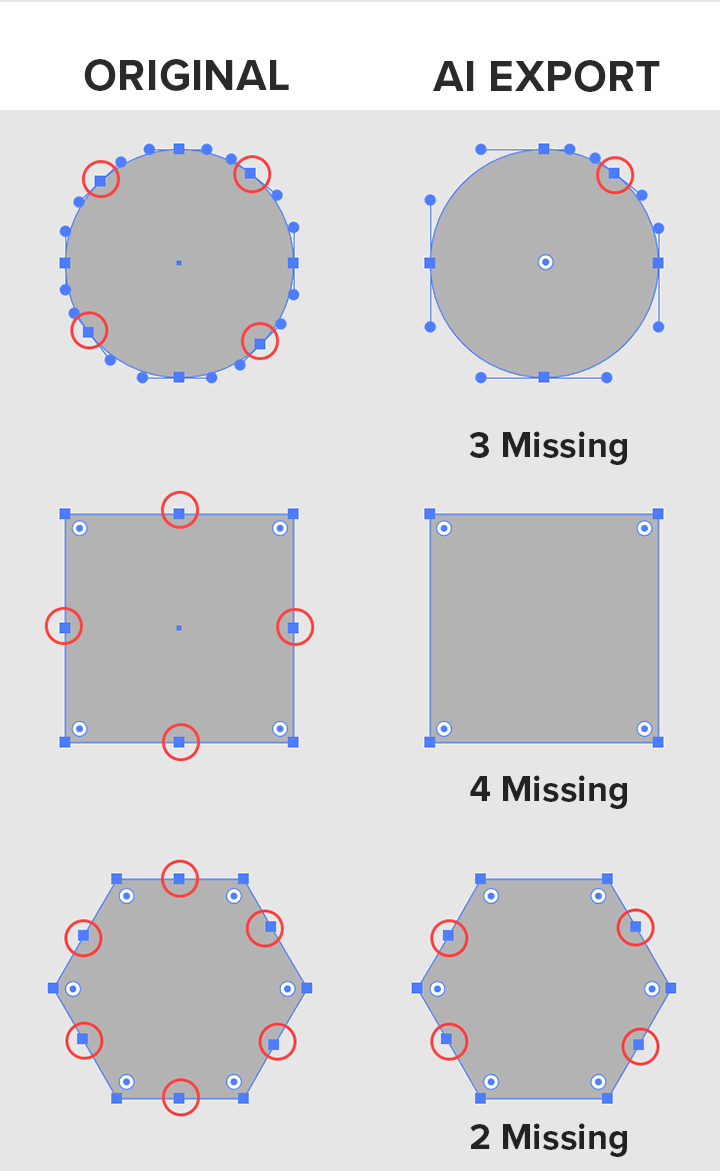
I used a few random shapes to show what happened (figure 3). On the left are the original shapes with extra points added and circled in red. On the right is the result of Adobe Illustrator’s export. Lots of points went missing.
So, what’s the solution?
It’s a fairly easy fix. Don’t export. Yep, that’s right. Skip the export. Instead, select the path elements and your background rectangle so you don’t get coordinate surprises. Then copy them (Ctrl + C) or Edit → Copy. Paste them into your code editor and the extra points remain intact.
Below, you can see how different the results are for the ‘start’ path.
<!-- Regular export result -->
<path id="start" d="M200,198.5H50c0-82.29,67.71-150,150-150s150,67.71,150,150H200Z" />

<!-- Copy and Paste result -->
<path id="start" d="M200,198.5h-23.7h-21.9h-22.2h-25.9H81.4H50c0-82.3,67.7-150,150-150s150,67.7,150,150h-18.1
	h-17.9h-16.5h-22.5h-24.8h-26.5H200z" />
Save As… also works
Please note: if you ‘Save/Save As’ the SVG, the extra points also remain intact. However, this adds a step to your workflow since you will need to open the file and copy/paste the path data into your code editor for the morph.
I personally don’t use the Save feature very often for my SVGs. I prefer to choose Export and then, instead of completing that process, I click the ‘Show Code’ button so I can just grab what I need and paste it into my project.
A smooth result
Now take a look at how nice the morph looks when all the points stay where they should.
See the Pen Melt Copy Paste by Craig Roblewsky (@PointC) on CodePen.
Side-by-side comparison
The final demo is a side-by-side comparison of the two different exports.
See the Pen Melt Side By Side by Craig Roblewsky (@PointC) on CodePen.
Overlay morph paths
I will point out that you need to create your morph paths at the same location and almost always right on top of each other.
I only used the side-by-side view earlier for illustrative purposes. When you morph with GreenSock’s MorphSVG plugin, the morph not only takes on the shape attributes of the target, but also the location. Sometimes you may want that, but usually not.
Final thoughts
You can see how smoothly you can morph from a hard-edged starting shape to something much more organic simply by adding a few points. I hope you found some of the info useful. Have fun with your organic SVG morphing and until next time, keep your pixels movin’.


