It’s a fun one this time. We’ll be making a retro-style film countdown animation using a SVG circle mask and a simple gradient. This is a premiere tutorial. See what I did there? Movie. Premiere. Get it? Groan… okay, let’s get started.
The SVG elements setup
The demo uses a little pop-up screen for the projected film, but it’s not necessary for the effect so I won’t be talking about that part of it. The first thing to look at is the gradient. Nothing fancy here. Just a simple radial, three-stop gradient.
<radialgradient id="filmGradient" cx="600" cy="450" r="340" gradientUnits="userSpaceOnUse">
  <stop offset="0" stop-color="#e6e6e6" />
  <stop offset="0.1" stop-color="#d1d1d1" />
  <stop offset="1" stop-color="#1a1a1a" />
</radialgradient>
It is applied to two, yes two, rectangles. Why two? One will be unmasked and its opacity will be reduced to appear slightly lighter. The masked group rectangle will be revealed on each rotation via a circle in the mask element.
    <rect width="700" height="500" x="250" y="200" rx="30" ry="30" opacity="0.6" fill="url(#filmGradient)" />
    <g mask="url(#filmMask)">
      <rect width="700" height="500" x="250" y="200" rx="30" ry="30" fill="url(#filmGradient)" />
    </g>
You can check the demo for the rest of the HTML setup. It’s just some circles, lines and a text element that is the counter. Once all the pieces are in place, you get this result.
See the Pen Film Countdown Starter by Craig Roblewsky (@PointC) on CodePen.
The big circle mask
The important part of this one is the circle in the mask. We’ll be animating the stroke of that circle with the DrawSVG plugin from GreenSock.
First, we need to know how big the diameter of the circle needs to be to cover our screen. How do we figure that? We know the width of the projected screen is 700 and the height is 500. From there, we can figure the diameter needed. In this case, we need the radius so we divide the result by two.
// Pythagorean theorem to find the needed circle radius
let radius = Math.sqrt(Math.pow(700, 2) + Math.pow(500, 2)) / 2;
// radius output: 430.11626335213134
The radius needs to be 430, but there will be a stroke on the circle and SVG strokes are center aligned. We, therefore, need to make a couple of adjustments. First, we round the 430 up to 432 and divide by 2 for a radius of 216. Second, we make the stroke (not the circle radius) 432. Since the stroke is center aligned, it gives us a diameter of 432.
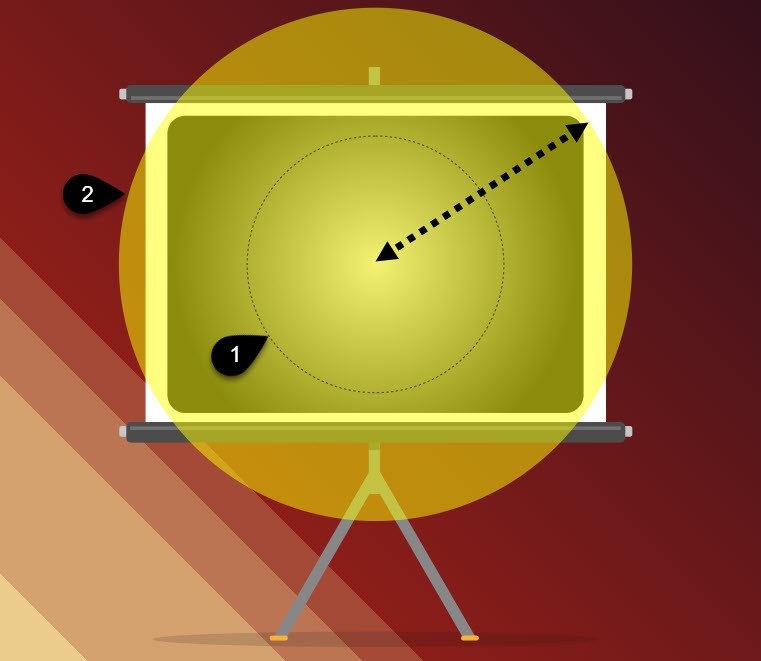
In figure 1, I’ve added another demo circle in yellow so you can better see what’s happening in the mask. Our circle has a radius of 216 (#1 in figure 1). Adding a 432 stroke gives us a full circle (#2 in figure 1).
The masked circle looks like this in the HTML.
<mask id="filmMask" maskUnits="userSpaceOnUse">
  <circle class="big" cx="600" cy="450" transform="rotate(-90 600 450)" r="216" stroke="#fff" stroke-width="432" fill="none" />
</mask>
The GSAP code
From there, the animation code is really easy. It’s just a couple of tweens. We animate the stroke of the big circle mask from 0 over the duration of 1 second. The little line follows along the edge of the circle. We don’t want any easing because we’re going to repeat this a few times therefore, we set the ease to “none”.
After the first iteration, the timeline calls the changeIt() function and simply decrements the count by 1. That whole process is repeated until the countdown reaches 1. The code looks like this:
gsap
  .timeline({
    defaults: { duration: 1, ease: "none" },
    repeat: count - 1,
    onRepeat: changeIt
  })
  .to("#rotator", { rotation: 360, svgOrigin: "600 450" })
  .from(".big", { drawSVG: 0 }, "<");

function changeIt() {
  count--;
  countDown.textContent = count;
}
Finally, the big moment. You put it all together and you get a nice little retro-style film countdown.
See the Pen Film Countdown by Craig Roblewsky (@PointC) on CodePen.
Final thoughts
The masked circle works really well for our countdown animation, but you can use it for radial wipes and reveals too. It’s handy for lots of situations. I hope you had a little fun and picked up some ideas today. Until next time, keep your pixels movin’.


