Let’s grab some SVG shapes with hard edges and unfold ’em. Squares? Sure. Triangles? Oh yeah. Hexagon? Sorry, can’t do that one. Just kidding. Of course we can. We’re going to use a helper line and it will be amazing. Well, maybe not amazing, but it’s a neat little trick.
This is a three-post series involving tricks with helper lines. Be sure to check out Unrolling Circles and Unwrapping Circles too.
Unfolding square
Before we start coding and diving into the nitty-gritty details, let’s take a look at an unfolding square.
See the Pen Unfold It Single Target by Craig Roblewsky (@PointC) on CodePen.
Prepare your vector files
For this to work properly, you need to have the proper starting point on your paths. That point is the leftmost point on the bottom segment of your path. To make certain of this, you can create your shape in Adobe Illustrator and use the scissors tool to cut the shape at that point. More details about cutting points can be found in my Cut and Rejoin article.
Note: all sides need to be the same length. I may add varying length sides to this later, but for now, they need to be the same.
Path direction is important
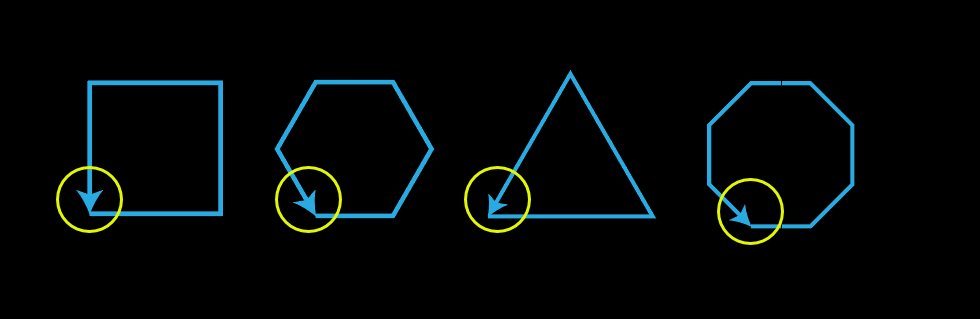
It’s also important the path flows clockwise. You can verify this by adding an arrowhead in Illustrator. In the following image, I’ve added an arrowhead to the start point of each element after I cut the path.
Note: if you want a right → left unfold, you would reverse the above artwork prep information.
The JavaScript
I’m registering the needed GreenSock plugins, adding a few variables and master timeline. I’m also setting the stroke-width and stroke color with JavaScript. You’re welcome to set them in the CSS or as presentation attributes, but I prefer doing it in the JavaScript.
gsap.registerPlugin(MotionPathPlugin, DrawSVGPlugin);

let dur = 1.25;
let mainEase = "none";
let master = gsap.timeline({ repeat: -1, yoyo: true, repeatDelay: 1 });
const svgns = "http://www.w3.org/2000/svg";
let demo = document.querySelector("svg");
const strokeWidth = 4;
const strokeColor = "#5cceee";
Helper line
To make this work, we’ll be rotating the target object clockwise and at the end of each rotation, we erase a segment of the path. At the same time, we increase the length of the helper line by the same segment length.
You probably noticed the helper line is not in the HTML. We’re going to create that on the fly. If you’d like more info, I wrote a whole post about creating SVG elements with JavaScript.
<svg xmlns="http://www.w3.org/2000/svg" width="600" height="300" viewBox="0 0 600 300">
    <path id="square" d="M38,212V88H162V212Z" fill="none" stroke="#5cceee" stroke-miterlimit="10" stroke-width="4"/>
</svg>
The unfold() function
Our unfold() function takes two arguments. Those are the target path and the number of sides. I toyed with the idea of calculating the number of sides, but it proved problematic in cases where there was an extra point along one of the segments. For my purposes, entering the number just seems easier.
function unfold(target, sides) {
  let degrees = 360 / sides;
  let segment = DrawSVGPlugin.getLength(target) / sides;
  let start = MotionPathPlugin.getRawPath(target)[0];
  let xPos = start[0];
  let yPos = start[1]
The first part of the function gives us position data for our helper line and the path length of our target. I’m using GreenSock plugins for this. The getRawPath() method returns arrays of points. We only need the first point of the first array and that will be where our helper line starts.
Degrees for our turns is fairly easy → 360/sides. Finally, the getLength() method tells us the length of each path segment by taking the total divided by the number of sides. Armed with this information, we can create and append our helper line.
  let lineTarget = document.createElementNS(svgns, "line");
  demo.appendChild(lineTarget);
  gsap.set([lineTarget, target], {
    stroke: strokeColor,
    strokeWidth: strokeWidth
  });
Position the helper line and target length
Next, we create the timeline and use a couple set()s to position the helper line and erase part of the target path. Setting the target’s DrawSVG value to segment * (sides – 1) results in the bottom segment being hidden. That’s why the path needed to flow clockwise. In the case of our square, we now see segments 1-3, but segment 4 is hidden.
At the exact same time, we set() our helper line to the length of one segment by updating the x2 attribute. Now it’s in the same position as the segment that was just hidden on the square. Since the helper line’s start point is the same as that first segment, it looks like nothing happened, but it did.
  let tl = gsap.timeline({
    defaults: { duration: dur / (sides - 1), ease: mainEase }
  });
  tl.set(target, { drawSVG: segment * (sides - 1) });
  tl.set(lineTarget, {
    attr: { x1: xPos, x2: segment + xPos, y1: yPos, y2: yPos }
  });
Loop for the rotations
Now that the first target segment is hidden and the first helper line segment is revealed, we need to rotate the target and hide the next segment. We do this with a loop and add each new tween to the timeline. Notice we’re looping one less time than the number of sides. That’s all the rotations we need for each target.
  for (let i = sides - 1; i > 0; i--) {
    xPos += segment;
    tl.to(target, { rotation: "+=" + degrees, svgOrigin: xPos + " " + yPos });
    tl.set(target, { drawSVG: segment * (i - 1) });
    tl.set(lineTarget, { attr: { x2: "+=" + segment } });
  }

  return tl;
}
The rotation
The rotation tween uses a really handy GreenSock property called svgOrigin. Similar to transform-origin, you rotate around any point in the SVG. So, we increment the xPos variable by one segment length. Now the rotation occurs around the bottom right position of the square. The yPos variable will not change on each rotation.
Show and hide segments
Immediately at the end of the rotation, we set the target to one less segment than we were showing. In this case, we now see the 1-2 segments of the square. At the same time, we update the x2 attribute of the helper line by a length of one segment. That process is then repeated in the loop for the final two segments. Finally, the timeline is returned to the master timeline.
Keep in mind the rotation is an animation, but the segment length changes are just being set at the appropriate time.
See the Pen Unfold It Single Target by Craig Roblewsky (@PointC) on CodePen.
Behind the scenes
In this version, I’ve set the helper line stroke to yellow so you can better see what is actually happening.
See the Pen Unfold It Single Target Show Helper Line by Craig Roblewsky (@PointC) on CodePen.
This version shows the helper line in yellow and I’m not hiding each segment of the square as it rotates.
See the Pen Unfold It Single Target Show Target by Craig Roblewsky (@PointC) on CodePen.
Multiple Targets
Since we’re using a reusable function for the animation, we can feed in as many shapes as we like. In the final example, I added 4 hard-edged shapes and this is the result.
See the Pen Unfold It Tutorial Final by Craig Roblewsky (@PointC) on CodePen.
Final thoughts
As I mentioned at the beginning, you can also use this for a right → left unfolding. You’d just cut your start path in the lower right and it would need to flow counterclockwise.
I hope you folded a few pieces of info into your code toolbox. See what I did there? Folded. Great comedy and a unfold SVG shapes tutorial. What more could you need? Until next time, keep your pixels movin’.


